How to Change the Icon for a Certain File Type in Windows
Basically, it was very easy to Change the Icon for a Certain File Type in Windows 10, 8, 7, XP and any previous versions of Windows.
Previously, we have learned about How To Create A Restore Point In Windows 7, and How To Restart Windows’ Explorer.Exe Using Taskbar And Start Menu.
We have also successfully written on Best Computer Tips and Tricks to Impress Your Friends
But now I am writing about “How to Change the Icon for a Certain File Type in Windows?”
But in recent times, it is somehow difficult to change the icon and extensions of the files because the latest versions of the Windows do not allow us to customize the file types.
Only a fraction of customization is allowed to the users.
Here, in this article, you will find an easy way to change the icon of the files using Windows 7 and other latest versions of the Windows.
There is an option in Windows from which you can edit the file types according to your requirements. That option is File TypesMan which greatly works for Windows 7, Windows 8 and Windows 10.
This offers you a list of the file types and their extensions which can be edited easily. File TypesMan is offered by the Nirsoft and it is an alternative of “file types”.
Now let’s find out how someone can easily change the icon for a Certain File Type in Windows 10, 8, 7 or XP with slight efforts.
If you are feeling difficulty while changing the extensions of a particular file, you must read carefully the following instructions.
Try these also:
How To Display Custom Text Message On Windows Startup
How To Access The Most Recently Opened Documents In MS Word 2016
How To Take Screenshot Of Complete Webpage With One Click
So, to change the icon for a certain File Type in Windows
- Initially, you have to download a copy of File TypesMan. CLICK HERE to download
- You can also directly download File TypesMan
- Unzip it
- The downloaded copy of the File TypesMan will work easily with the latest versions of the Windows but be careful while choosing 32-bit or 64-bit version
- After downloading, double-click on the “File TypesMan.exe” and it will start running. You don’t need to install it
![]()
- Now click on “Default Icon”
- A column list will be shown to you from which you can edit easily
- If you need to change only the extensions of the files, you can sort out the list by their extensions
![]()
- If you want to save some time to scroll the files, just click on “Find” button or press Ctrl+F
- “Find what” section will show the extension of the file types. If you are in search of another file types you must click on “Find Next” button
- If you want to close the “Find” window click on “Cancel”
![]()
- Right-click on the extension whose icon you need to change. And select “Edit Selected File Type”
![]()
- An “Edit File Type” window will appear in front of you where you have to click on “…” button which is presented at the right side of “Default Icon” section
![]()
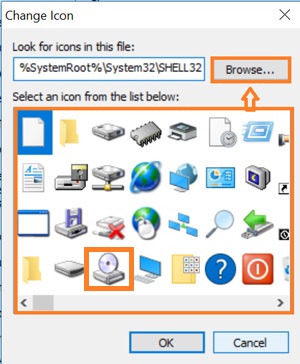
- A “Change Icon” will appear on the screen which shows some basic icons but if you want some more icons click on “Browse”

- After browsing, when you select your icon, it will come in the list of icon which already presented
- Now, select the icon you want from the list and press “OK” button
![]()
- If you have to change the file type of more than one file, you must repeat the above steps
- After you finish, you can close the “File TypesMan”
- Open the file explorer to check out the changes you made
![]()
- In the above screenshot, you can easily distinguish the changed file types.
With all hopes, this article will help you to Change the Icon for a Certain File Type in Windows. If you have a different experience regarding this article, do not hesitate to share your views with us.
