Here’s how to remotely turn on a PC over the internet on Windows 10, macOS, or Linux. TeamViewer remote Wake Up on LAN and Wi-Fi. This step-by-step guide will cover what is Wake-on-LAN and how does it power on pc remotely? Also, how to set up Wake-on-LAN to turn on computer remotely in two steps for Windows, Linux, and macOS. We will also cover how to use Wake-on-LAN over the internet to wake up a PC remotely and more.
Basics Considerations:
To access your pc remotely and wake on LAN over the internet
- Wake-on-LAN (WoL) command will remotely turn on a computer, whether it is in sleep mode, hibernated, or completely powered off.
- First, configure Wake-on-LAN in BIOS on the motherboard, then make necessary changes in the operating system.
- Wake-on-LAN Settings is compulsory for every computer, and then comes the operating system
Previously, we have written detailed articles about windows tips and tricks on:
- how to add a Static Route to the Windows Routing Table
- how you can add a Command “Open PowerShell Here” To Right-Click Folder’s Menu in Windows
- How to Be the Master in Basics of Windows Registry Editor
Today, we will know about how you can remotely turn on PC with your Android and iPhone or with other computers to anywhere in the world over the internet
Table of contents
Using Remote Desktop or remote file access is not a bad thing to access your computer anywhere but there is one thing annoying you have to turn on computer after leaving your house/office and then use a computer anywhere in the world. The other drawback is it consumes more and more power. Then you must be thinking that what other methods are there instead of accessing your PC via remote desktop?
The good news is that you can power on your PC anywhere anytime whenever you need to use it.
Windows gives us the advantage of “Wake-on-LAN”, which sends some magic packets that will turn on your PC over the internet. But before going to the topic “how to remotely turn on your pc over the internet”, we should know about what is Wake-on-LAN and how does it work?
What is Wake-on-LAN?
Wake-on-LAN is an Ethernet or Token Ring computer networking standard or simply a hardware/software solution that remotely turns on a computer and server by a network message. A computer that has a network connection and is ACPI (Advanced Configuration Power Interface) compatible, can be awakened by a network message, called the “Magic Packets.” So, the magic packets are used to send Wake-on-LAN-enabled ethernet adapters and motherboards to switch on the called system.
If you want to wake up a computer via Wi-Fi, then it must be compatible with a supplementary standard called Wake on Wireless LAN (WoWLAN).
Equivalent Terms: The alternate terms used for Wake-on-LAN are remote wake-up, power up by LAN, resume by LAN, resume on LAN, power on by LAN, wake up on LAN, and wake on WAN
How Does Wake-on-LAN Works?
Basically, all the Ethernet connections containing Home, Work, Wireless data networks, and the Internet itself are based on frames sent between computers. While the Wake-on-LAN is based on a frame known as Magic Packet.
The Magic Packet, containing the MAC address of the target computer is sent to every computer in a network. While every computer connected to the network has a Network Interface Card (NIC) and each NIC has a unique identifying number called MAC address or physical address. The Magic Packet is listened to by all the powered down or turned off computers attached to the network and each computer denies receiving it, except the one whose MAC address matches with the address written on Magic Packet. After listening and receiving the Magic Packet, the Network Interface Card (NIC) will send a signal to the computer’s power supply or motherboard to initiate system wake-up, in the same way, that pressing the power button does.
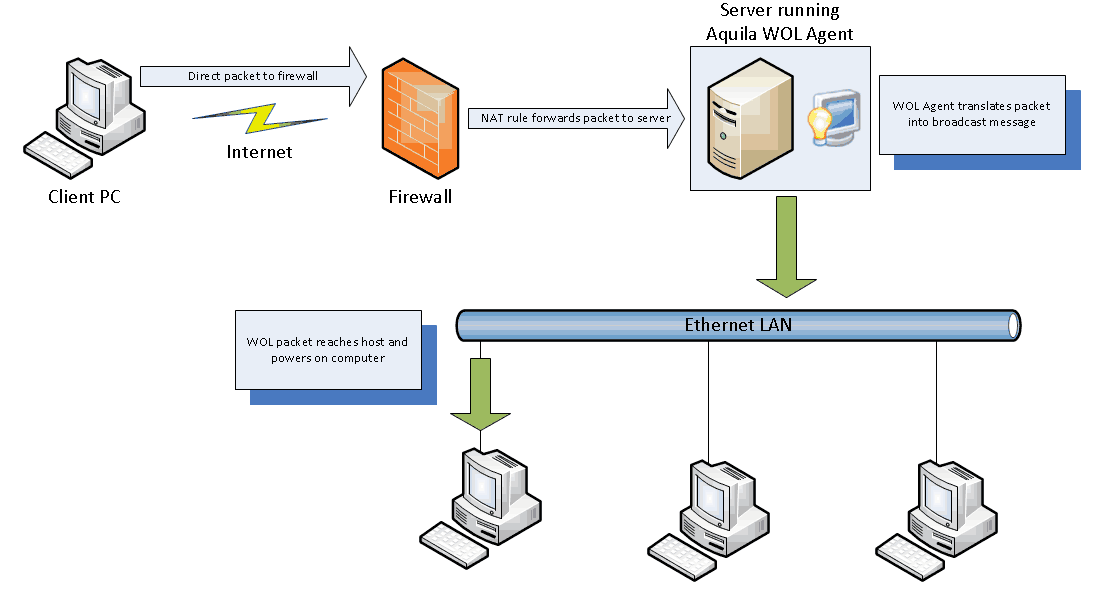
Wake-on-LAN can remotely power on pc, no matter which operating system the computer is running (Windows, Linux, Ubuntu, and Mac). The only requirement is your operating system, network interface card, and the computer motherboard BIOS must be compatible with receiving magic packets.
Now, let’s proceed with the discussion to find out the best ways to “enable wake on LAN on Windows 10, 8 and 7, XP” MacOS, Linux, Unix, and Ubuntu after which you can “turn on a computer remotely with Windows 10” and other versions of operating systems easily.
How to Set Up Wake-on-LAN?
There are two steps to enable Wake-on-LAN on computers
Method 1: Configuring Wake-on-LAN through BIOS
Method 2: Setting up through Operating System
If you opt for the first step and make the said changes in the BIOS setup then you don’t need to set up Wake-on-LAN to your operating system whether it is Windows, macOS, Linux, or Ubuntu.
Method 1 – How to Enable WoL through BIOS Setup?
To turn on your computer remotely, you need to configure Wake-on-LAN from the BIOS setup of your computer so that the software can listen to incoming wake-up requests. These settings are available in the computer’s BIOS or UEFI settings. On your PC you have to ensure that the Wake-On-LAN option is enabled.
Note: If you do not find the Wake-On-LAN option in BIOS or UEFI, then check your PC motherboard’s manual whether it supports Wake-On-LAN or not.
Let’s enter the BIOS and enable Wake-on-LAN from the BIOS so that we can power on a computer remotely.
Step 1: Restart your computer, or turn it on if it’s already off.
Step 2: Wait for an entering BIOS setup message for the first few seconds, you’ll see the following message depending on your PC’s BIOS:
- Setup: [key]
- Press [key] to access BIOS
- Press [key] to enter setup
- Enter BIOS by pressing [key]
- Press [key] to enter BIOS setup
- Press [key] to access system configuration
Step 3: Use the correct key to enter the BIOS of your PC or laptop or Macbook
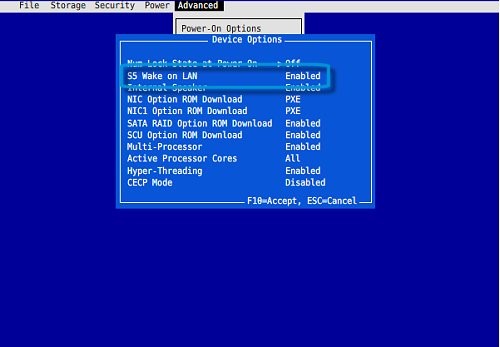
Step 4: Go to Power Management under the “Advanced” section. If you are using Mac then it may be “Resume On LAN.”
Note: It may be possible that the WoL name is not clearly mentioned in the BIOS, then you can find it in the help section within the BIOS. Also, if your mouse is not working then use the keyboard to navigate through the WoL.
Step 5: Once you reached the WoL Settings, hit Enter to toggle it ON or to show a menu where you can turn it on and off, or enable/disable it.
Step 6: Press F10 to Save the Changes.
Note*: If you don’t see the Save changes option then use the instructions from the bottom of the screen hit the proper key, and save and exit from the BIOS.
Method 2 – How to Set Up Wake-on-LAN from the Windows 10, 8, 7, and XP?
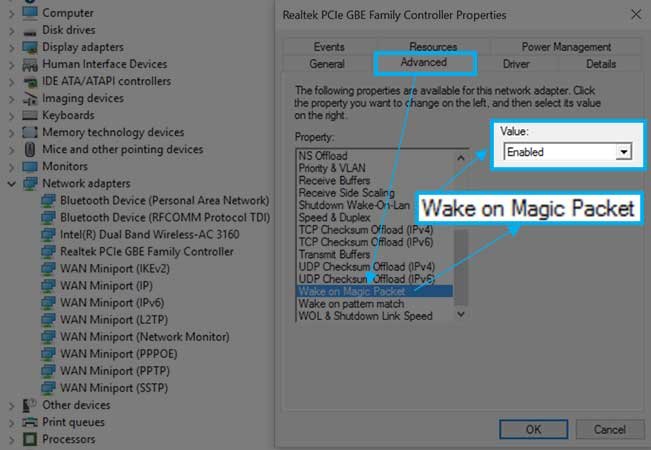
You may also have to enable this option from within Windows, whether there’s a WoL option in your BIOS or not. Open the Windows Device Manager, locate your network device in the list, right-click it, and select Properties. Click the Advanced tab, locate “Wake on Magic Packet” in the list, and enable it.
You can also enable it once you have been Logged in to Windows, you have to search for the WOL option in your BIOS or not.
Here’s how to turn on your computer remotely by enabling Wake-on LAN on Windows 10 computer.
Step 1: Right-click on My Computer Select Properties
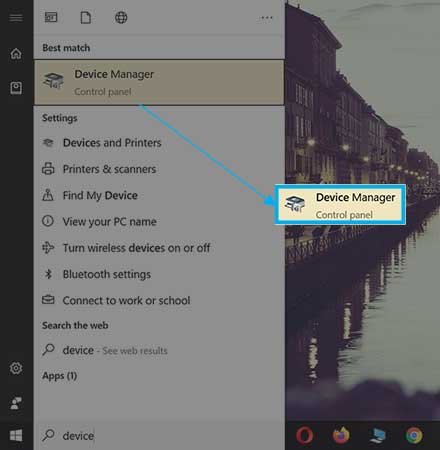
Step 2: Then select Device Manager or go through the Windows Search and find out and click on Device Manager.
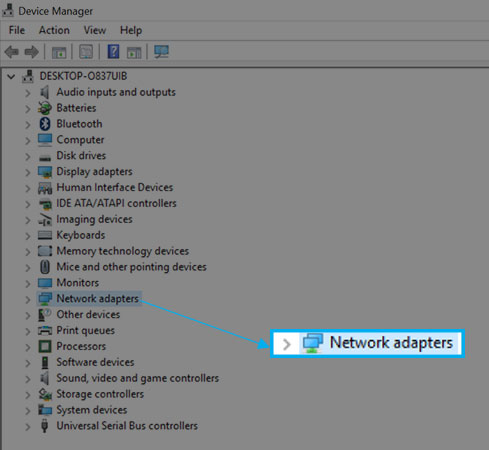
Step 3: Find and click on the Network Adapter by double-clicking or selecting the + or > button and expanding the section. Just ignore Bluetooth connections and virtual adapters.
Step 4: Right-click on your network device (An Ethernet LAN Card or a WIFI LAN Card)
Step 5: Select properties or you can double-click on it to open the properties box.
Note*: It may be your NIC is Realtek PCIe GBE Family Controller or Intel Network Connection. But it depends on the computer and NIC issuer.

Step 6: Go to the “Advanced” tab and scroll down to select “Wake on Magic Packets” and Enable it from the Value.
Note*: If you can’t see it then skip this and straightly go to the point number. However, the Wake-on LAN will work either way.
Step 7: Now, open the Power Management tab within the same window.
Note*: In some operating systems, it can be a “Power” tab.
Step 8: Enable by ticking a check box “Allow this device to wake the computer” and “Only allow a magic packet to wake the computer”.
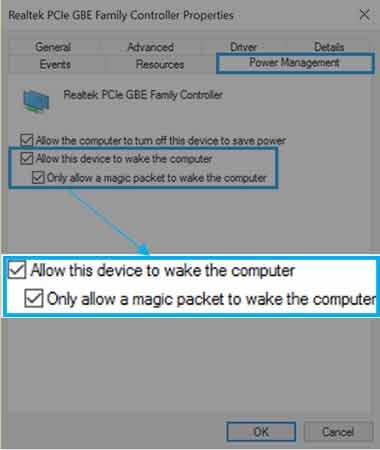
Note*: If you are unable to see these options or see greyed-out buttons then you need to update the network interface drivers. It may also be rarely possible that your NIC doesn’t support the WoL. In such a situation, you need to check your Wireless Network Interface Card.
Step 9: Press the OK button.
That’s it. You have successfully set up wake-on LAN on Windows 10 operating system, and you can start the computer remotely if left power down, hibernated, or in sleep mode
How to Use Wake-on-LAN on Computers Using Windows 10
There is a possibility that Wake-on-LAN may not work on your PC using fast startup mode in Windows 8 and 10. In such a situation, you should disable Fast Startup.
“Subnet Directed Broadcast” is used to wake up a computer on LAN, if you don’t understand the “Subnet Directed Broadcast” then let’s discuss it
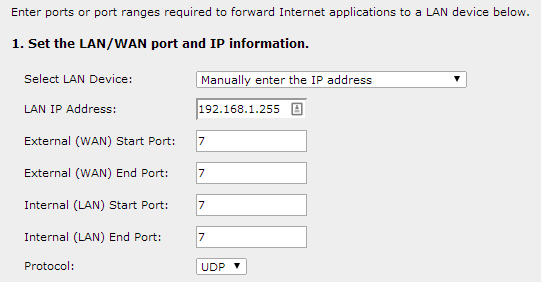
Wake-On-LAN uses UDP. Many utilities use ports 7 or 9, but here, you can use any port of your own choice. You will have to forward a UDP port to all the IP addresses behind your router.
You cannot forward a UDP port to a specific IP address.
The Wake-on-LAN packet will be sent to every device attached to a router. When the information will match with the WOL packets on the specific device on the network, the remote PC will wake up. This is what we call “Subnet Directed Broadcast.”
To do this, you’ll need to forward the port to the “broadcast address,” which will broadcast the packet to all computers on a network. The broadcast address is ..*.255. For example, if your PC has the IP address 192.168.1.123, you’d enter 192.168.1.255 as the broadcast address. If your PC has the IP address 10.0.0.123, you’d enter 10.0.0.255 as the broadcast address.
For this purpose, you need to forward the port to the broadcast address. In simple ways, that forwarding port will broadcast the packet to all the computers attached to that network.
Example
The broadcast address for class C IP Addresses maybe ..*.255 (provided that your IP address is not subnetted)
Let’s say an IP Address on your computer is: 192.168.1.123
Then the broadcast ID will be 192.168.1.255 because 192.168.1.0 is your network ID and 255 is the total no. of computers/nodes/devices attached to the network.
If your IP Address is 100.0.0.120 then you’ll have to enter 100.0.0.255 as the broadcast address.
Let’s configure the router with port forwarding and broadcast IP.
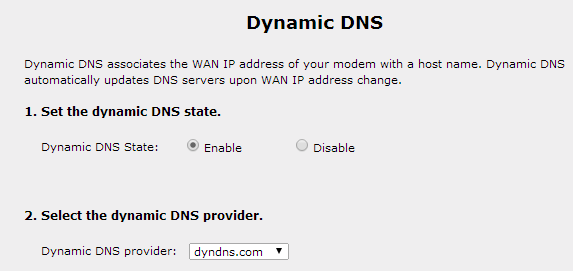
What if your PC is attached to a router with a dynamic DNS server, and your IP changes every time?
No issue,
Still, you will send wake-on-LAN packets router’s dynamic DNS hostname that will find a way to access your pc remotely and can turn on pc from anywhere in the world.
But how?
See the Screenshot below:
The next step is to send magic packets (Wake-on-LAN) to remotely turn on your PC over the internet.
You may find various kinds of software tools, and online websites which offer a variety of Wake-On-LAN utilities for every type of platform such as Depicus which is used to wake up a pc remotely
Microsoft Remote Wakeup Software for Windows 10 and 8
- openHAB
- Wake on LAN (Magic Packet)
- MagicPacket
- Remote Terminal
- Windows IoT Remote Client
- Windows IoT Remote Client
- SmartThingsToStart
- What’s IP Pro
You can also use the graphical Wake-On-LAN Windows program which is a web-based interface that sends magic packets through a web browser and wake up the computer remotely using LAN and WAN.
You may also have an option to install Wake-on-LAN Android app for android mobiles to turn on pc remotely with android mobiles.
Here’s Wake-on-LAN iOS app for iPhones (to turn on PC with iPhone) or any iOS device to send magic packets to remotely turn on your pc over the internet
In order to use any of the above utilities, you will have to enter the following four bits.
IP Address or Domain Name: Enter the WAN IP Address of your router or a dynamic DNS address (e.g., you.ddns.com)
Subnet Mask: Enter the appropriate subnet mask of your computer attached behind the router.
MAC Address: Enter the MAC address of the network interface listening for the Wake-On-LAN packet.
Port Number: Enter the UDP port number.
The technique works with the correct information, if everything is configured precisely, your PC will wake up.

Now, let’s discuss whether can TeamViewer wake up a sleeping PC.
How to Use TeamViewer Remote Wake Up to Turn On Computers Over the Internet Using Windows 10
Let’s make all the Wake-On-LAN processes easier with remote access software like TeamViewer, Remote Utilities and Parallels Access, and UltraVNC. So, you can skip such a tedious workload and use remote access software to remotely turn on your PC over the internet.
In our example, for understanding, we will use Team Viewer to remotely turn on your PC over the internet.
TeamViewer remote wake-up option is available under Extras > Options in TeamViewer. Click the Configure button next to Wake-on-LAN to set them up.
Let’s start!
- For this, open TeamViewer and go to Extras and click on Options
- Then in General find the Network settings
- Then choose Wake-on LAN and from there click on the configure button

How does TeamViewer Wake up Computers Remotely?
TeamViewer Wake-on-LAN will send the magic packets to the computer running TeamViewer too, and that PC can send the Wake-on-LAN magic packets from within the network. You won’t have to set up port-forwarding, use third-party tools, or worry about the remote IP address. You will still have to enable Wake-on-LAN in the BIOS and device manager, however.
Now let’s understand the entire process of TeamViewer Wake-On-LAN Wif-Fi
Let’s say you have two different computers on a LAN network or at home. One PC is turned off and is named “Target Computer” with TeamViewer installed and only one PC is powered on and has running TeamViewer application. Then you can easily wake up Target Computer remotely with the TeamViewer remote wake-up function on one condition if you have set up the TeamViewer app correctly.
Let’s say you have to access the target computer over the internet using your mobile phone having an installed version of TeamViewer.
The TeamViewer Wake-on-LAN Wi-Fi will send a wake-up signal (magic packet) to the TeamViewer network, it will go through the firewall (if is used then we have to allow it here also) then the wake-up signal will go to the turned-on computer, the turned-on computer will then send a wake up on LAN signal to the turned-off Target computer to boot computer remotely. As shown in the figure below.

You can also configure the “Public IP address” in TeamViewer for the purpose of Wake-on-LAN. This Public IP Address will initiate a Wake-up on the LAN magic packet from the TeamViewer application, even if all the remote devices/PCs are turned off.
You will have to configure the port forwarding process that the computer is running TeamViewer and is accessible publically.

The networking bits can be a bit complicated, especially if your router gets in your way and prevents you from changing the settings you need. A third-party router firmware may be more helpful—in fact, DD-WRT even provides an integrated way to wake up computers remotely on a schedule by sending magic packets.
You can face issues while entering the network bits, maybe your router won’t allow you to change your settings. In such a situation, you can change your router firmware to a third-party organization.
There is a DD-WRT service that provides the facility to remotely turn on your PC over the internet.
How to Setup macOS Wake-on-Demand?
Mac Wake-on-LAN is enabled by default in all macOS versions 10.6 or later. If you are using a lower than macOS 10.6 operating system, then here is how you can create a bootable Linux USB flash and install updated Linux on your PC.
Here’s how to configure WoL in macOS and start a computer remotely:
- Go to the Apple menu, and choose “System Preferences.”
- Then choose Energy Saver, or you can also find this option from the (top menu) View > Energy Saver.
- From the Energy Saver window, find Wake for network access and tick mark the check box next to it.
If your MAC supports Wake on Demand over Ethernet and AirPort, then it is called Wake for network access only. But if Wake on Demand only supports one of these two, then it is known as Wake for Ethernet network access or Wake for Wi-Fi network access.
Now, let’s talk about a Linux-based computer, like how it remotely accesses another computer over the internet and how it boots a computer remotely.
How to Setup Wake-on LAN on Linux by installing ethtool
The steps for turning on Wake-on-LAN for Linux to wake up a computer remotely are most likely not the same for every Linux OS, but here’s how to do it in Ubuntu:
Since Linux OS has various versions and setting up Wake-on-LAN on Linux is also different for each operating system. But here’s a solution for Ubuntu to remotely power on a PC.
Step1: Press the Ctrl+Alt+T shortcut to open Terminal
Step 2: Type the following command to install ethtool on Linux OS.
sudo apt-get install ethtoolStep 3: Command to check whether your computer supports Wake-on-LAN or not
sudo ethtool eth0Where eth0 is your Ethernet card
If you see “g” in the Supports Wake on value, then you can enable Wake-on-LAN on Linux.
Note*: Type the command ifconfig –a to see the available interfaces find the valid inet addr (IP address) and make sure eth0 is your default network interface if not then modify it and make it default.
Step 4: Command to set up Wake-on-LAN in Ubuntu:
sudo ethtool -s eth0 wol gNote*: Type the command ifconfig –a to see the available interfaces find the valid inet addr (IP address) and make sure eth0 is your default network interface if not then modify it and make it default.
Step 6: Use arrow keys in the Terminal and again check the Wake-on-Value is “g” instead of d, in the 3rd step.
Now, let’s proceed with our guide further on how to turn on your computer remotely that has installed RHEL / Fedora / CentOS / Debian and Ubuntu Linux.
How to Enable WoL in Ubuntu Linux / RHEL / Fedora / CentOS and Debian?
To remotely access another computer over the internet:
Please make sure that you have connected the Network Interface Card (eth0 or eth1) with the motherboard and enabled the Wol from the BIOS setup. Here’s how to enable WOL in Ubuntu Linux / RHEL / Fedora / CentOS and Debian.
Installing A Client Software
We’ll install software to send Wake-on-LAN magic packets to awake the target computers. There are many tools that can be used for this purpose on macOS, OS X, Linux distros, NetBSD, OpenBSD, FreeBSD, and many Android, Windows, and iOS-supported smartphones.
How to Install etherwake Command in Debian/Ubuntu Linux
First of all, you need to install an etherwake command that will send a Wake-On-LAN “Magic Packet” to the Linux OS. Type the following apt-get command or apt command and install the etherwake on Debian / Ubuntu Linux desktop:
$ sudo aptitude install etherwakeOR
$ sudo apt install etherwakeYou just need to enter “y” for yes to confirm the installation and the process will start immediately.

Installing net tools On RHEL/CentOS Linux
We’ll install net-tools on RHEL/CentOS Linux operating system that will send a Wake-On-LAN “Magic Packet” to the computers to be awakened.
You can also install the Perl script on Debian/Ubuntu Linux operating systems to wake up computers through the following command:
sudo apt-get install wakeonlanHowever, the following command dnf works well on Fedora/RHEL/CentOS operating system.
$ sudo yum install net-toolsOnce, you type the above dnf/yum command, it will show you a transaction summary of total download size and the disk space it will occupy after installation and will ask you for confirmation with the following message:
Is this ok [y/N]:Type “y” without double quotes to install the net-tools. For instance:
Is this ok [y/N]: yIt will start downloading according to its size, usually in KBs, and after downloading it will automatically start installing net-tools on your Fedora/RHEL/CentOS systems.

Once, the installation is completed, you’ll see the following message at the end:
Installed:
net-tools-2.0-0.52.20160912git.el8.x86_64

Complete!
How to Use WoL in Red Hat Linux?
The net-tools package is automatically installed on Red Hat Linux at the time of installation. You can use the ether-wake command to wake-on-LAN computers and turn it on from anywhere.
Installing wakeonlan on macOS Unix
To install wakeonlan on macOS Unix, you first need to install Homebrew on macOS and then execute the following command:
brew install wakeonlanHow to Send WOL Magic Packets Under Linux Operating System?
Command to send WoL magic packets in Linux:
# wakeonlan Enter-MAC-AddressOR: You can use the following commands to turn on your pc remotely
# etherwake Enter-MAC-Address
# etherwake -D Enter-MAC-Address
Command to send WoL Magic Packets in RHEL / Centos / Fedora Linux
# ether-wake Enter-MAC-AddressExample
If your MAC address is ab:cd:ef:12:34:56, you will type:
# wakeonlan ab:cd:ef:12:34:56
OR: You can use the following command to remotely wake up a pc
# etherwake ab:cd:ef:12:34:56
Where,
ab:cd:ef:12:34:56 is remote servers mac address.
You can obtain a mac address using a combination of the ping command and arp command:
You can also use the pin and arp command at the same time to get the mac addresses in a network
ping -c 4 server3 && arp –nHow to Use Wake-on-LAN with Limited Broadcast Address Under Linux?
Here’s how you can use the limited broadcast address (255.255.255.255)
$ wakeonlan mac-address
$ wakeonlan mac-address-1 mac-address-2
Using a subnet broadcast address:
$ wakeonlan -i 192.168.1.255 macIf you want to use the destination port too, then the wol command to remotely wake up a pc will be:
$ wakeonlan -i 192.168.1.255 -p PORT mac-address
$ wakeonlan -i 192.168.1.255 -p 4242 mac-address
Using a file as a source of hardware and IP addresses:
$ wakeonlan -f homelab.wol
$ wakeonlan -f homelab.wol mac-address
How to Verify the Remote Linux Server Supports Wake-on-LAN?
To remotely turn on your pc over the internet, your computer NIC must have support for WoL. Here’s how to check the remote Linux server support WoL:
First of Restart the remote server
- Go to BIOS Setup
- Enter in the Power Management
- Then go to the “Wake On LAN”
- Turn ON WoL
- Save and Exit from the BIOS Settings
After enabling WoL in a remote server, you also need to activate it using ethtool. The ethtool command configures eth0 to respond to the magic packet.
So, you need to type the following command to configure ethtool:
# ethtool -s eth0 wol gWhere,
-s eth0 : represent the Network Interface Card. You can replace eth0 with your actual network interface device name.
wol g : sets up Wake-on-LAN using Magic Packets.
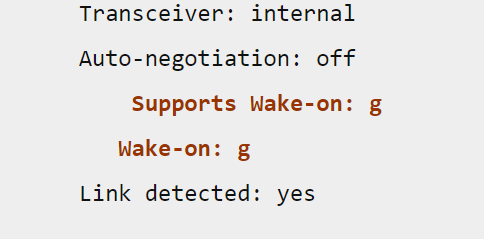
Type the following command to see the current status of wol for eth0, whether it supports WoL or not:
# ethtool eth0If you see:
Supports Wake-on: g
And wake-on: g
For RHEL/Fedora/CentOS/SL Linux, you can modify the command:
# vi /etc/sysconfig/network-scripts/ifcfg-eth0Add the below line:
ETHTOOL_OPTS="wol g"

OR

ETHTOOL_OPTS="wol g autoneg off speed 100 duplex full"
Save and close the file.
If you are using Debian / Ubuntu Linux, edit /etc/network/interfaces:
# vi /etc/network/interfacesAlso, add the following lines to eth0:
auto eth0
iface eth0 inet static
address 192.168.1.1
netmask 255.255.255.0
gateway 192.168.1.254
             post-up /sbin/ethtool -s eth0 wol g
             post-down /sbin/ethtool -s eth0 wol g
Final Words
We have discussed what is Wake-on-LAN and how to use it to remotely turn on computers on LAN and WAN. You learned how to set up WoL through BIOS and how you can enable WoL in Windows 10 and start the computer remotely. We have also tried to cover up in-depth details on how TeamViewer wakes up a sleeping pc on Windows 10, 8, and Windows 7, mentioning some Microsoft Wake-on-LAN software for Windows operating systems that are actively used to power on PC remotely. Then we have set up macOS Wake-on-Demand and configured/enabled Wake-on-LAN (WoL) in Ubuntu Linux / RHEL / Fedora / CentOS and Debian: The short summary is as follows:
Installed etherwake command in Debian and Ubuntu Linux with $ sudo aptitude install etherwake
Installed net-tools On RHEL/CentOS Linux to remotely access another computer over the internet:
By installing Perl script with command sudo apt-get install wakeonlan
$ sudo yum install net-tools
WoL in Red Hat Linux using net-tools package
Command to Install wakeonlan on macOS Unix: brew install wakeonlan
Command to send WOL Magic Packets under Linux operating system to remotely power on a pc: # wakeonlan Enter-MAC-Address
Command to send WoL Magic Packets in RHEL / Centos / Fedora Linux: # ether-wake Enter-MAC-Address
Command to use Wake-on-LAN with Limited Broadcast Address Under Linux: $ wakeonlan mac-address-1 mac-address-2
Command for using a subnet broadcast address: $ wakeonlan -i 192.168.1.255 mac.
Now, you can easily access your computer over the internet and even turn it on from anywhere in the world.
