
Table of Content
How to Create an SEO Role Playing XML Sitemap in Less than a Half Minute
If you are the beginner, and don’t know “how to create an XML sitemap which automatically boosts up your website SEO ranking” then go through the whole process from start to end to create one for your website.
The entire process will take your approximately 20 minutes
Some people like to work hard and some go with lowest effort to get easy wins.
Also, try these suggestions by TheFanmanShow
- Best WordPress CDN Services
- Best WordPress Themes and Template for Blogs
- The Best Techniques to Steal Your Competitors Search Traffic
- Top Trends in Entrepreneurship to Look For the Upcoming Year
- 10 Best Content Promotion Tools to Accelerate Traffic for Your Blog
It’s been 10 years in the field of SEO and marketing, I am trying to discover the new ways to meet the maximum guidelines of Google with the lowest level of efforts.
Basically, I love to:
Put low efforts and big wins.
That’s the place where everybody likes to be.
I got a lot of research in the SEO industry. Definitely, there are some techniques to apply that can deliver a lot with slight but intelligently efforts.
So, I am going to share one of those SEO techniques – how to create an XML sitemap?
The programmers may be attracted and the non-programmers may run away after reading the term “creating an XML sitemap”, for such bloggers, I would like to say, don’t worry and don’t be panic.
It is true that XML sitemap is considered a technical aspect of SEO, but believe me, it’s not so hard to make one for your own website/blog.
After reading the complete article you’ll say it’s not too technical and think that why didn’t have you created an XML sitemap before for your website.
Because in fact, you can create an XML sitemap in a matter of seconds. You don’t need to learn any code. Rather, you need to know how to click.
It’s totally free, simple and easy to create.
Are you ready to create an XML sitemap that can boost up your SEO campaign?
Before dip our toe to create an XML sitemap, let’s try to understand what is an XML Sitemap?
(“XML” stands for “Extensible Markup Language,” that is a way of displaying useful information on websites.)
If we take it simple, then it’s a list of website’s URLs.
It tells the overall structure of the website.
That’s what an XML sitemap is, but why you need it and what’s the purpose behind having at least one XML sitemap for your website.
Why you Need an XML Sitemap for Your Website?
Search engines use crawlers to understand your website completely and index the information it contained as I said in my earlier article how a search engine works?
No doubt, these crawlers are too intelligent to read all the content on your website but an XML sitemap makes it easier to completely understand all the content of your website for making healthier indexing.
Once a sitemap is uploaded to your website, it’s not a guarantee from Google and other search engines to improve ranking but it helps a lot in the indexing process.
Now how well your sitemap is and how well your website is indexed in the search engines has a lot of value in high ranking factor.
An XML sitemap works as a table of content for your blog website and allows the crawlers to take the essential part first, second, third and so on.
In other words, the search engines more index your website as according to the hierarchies we set in the sitemap.
But what about a well-structured sitemap?
A well-structured sitemap is the one which is fully descriptive from top to bottom
The Google and the other search engines, get a lot of assistance, when a specific page was updated, the frequency of updates to the page including all the relative pages within that page and how to find the content with the well-structured hierarchies set at the XML sitemap to index.
Carefully look what a useful information an XML sitemap contains.
URL Location: where the page is located on the website (its URL) <loc> http://www.example.com/mypage</loc>
Any Change: When the page was last time changed <lastmod>2017-12-12</lastmod>
Updated: how frequently a page is changed – <changefreq>monthly</changefreq>
Relative Priority: How a specific page is in relationship with one another page on the website/blog. <priority>1</priority>
These are the important points which are pretty much impressive and considerable while creating an XML sitemap for a website.
The disadvantage of not using a sitemap with your website, it’s a possibility that your website contains a duplicate content, that can affect your SEO ranking.
That’s why the SEO experts along with Google suggest you attach a sitemap to a website to index in a fast way.
Like I said at the start, I like easy wins with a lower level of efforts, and these lower level of efforts refers to have a sitemap with which you can tell Google, “Look that’s my website/blog and here are the pages I want you to index”.
In matters of minutes, Google will respond you and will index your website’s content.
It’s that simple.
Now, you’ll be thinking “do I really need a sitemap? Should I go through all this mess?
I would prefer you to have one.
Because you will gain a lot of following SEO benefits of XML Sitemap:
Do XML sitemaps Help in SEO?
Let’s clear the myth in our mind about do XML Sitemaps really help in SEO?
Here, what’s Google says about a sitemap
“If your site’s pages are properly linked, our web crawlers can usually discover most of your site. Even so, a sitemap can improve the crawling of your site, particularly if your site meets one of the following criteria…”
Look what Mat Cuts says about:
Is it still necessary to offer a sitemap to your visitors?
Also, there are a lot of SEO benefits of XML sitemaps, some of these are as follows:
- Besides this, the XML sitemap tells Google to:
- Crawl and index a website.
- What to crawl on a website.
- What kind of information contains in a website.
- When your content was updated (to give a favor for “fresh” rankings).
- How often your content is updated. (Update frequency)
- How important a specific content of a website is.
- Helps in faster indexation for dynamically generated pages
- Helps to overcome the limitations of weak internal linking of a website
- More helpful for large websites in more organized indexing
- And there are a lot more SEO benefits of XML sitemap. But these are enough to create an XML sitemap for your website.
Which Websites Need a Sitemap?
In “the following criteria”, Google claims that sitemaps are helpful for…
Here’s what Google claims that sitemaps are helpful for
- Fresh websites
- Websites with heavier content but poor internal linking
- Larger websites
- Websites with rich media content (images, audio, and video)
So, it’s clear from the above that almost every website must need a sitemap.
Types of Sitemaps?
Almost there are six kinds of sitemaps, you can use on your website.
These are:
- XML-Sitemap
- HTML-Sitemap
- Image-Sitemap
- Video-Sitemap
- News-Sitemap
- Mobile-Sitemap
Although, the first two types of sitemaps (XML sitemap or HTML sitemap) are often used in maximum websites.
We will discuss each sitemap some other time because we have to focus to “create an XML sitemap” as we have discussed so far.
But we will briefly have to know about the difference between the most two used sitemaps.
Difference between XML sitemaps and HTML sitemaps?
The simple explanation is “HTML sitemaps are written for humans and XML sitemaps are written for search engines”
Should I Use an XML sitemap or an HTML sitemap?
HTML sitemaps are easily read by humans and definitely increase the user’s experience. The Google and the other search engines reward a lot of those sites which have an appealing user’s experience.
As I said that XML sitemaps are written for search engines spiders. The search engines crawlers quickly extract all the important URLs stated in the XML sitemaps.
In many cases, you can improve your site’s ranking by improving your user experience. It may be the case that you provide a better user experience by providing an HTML sitemap.
But for faster indexing, we use an XML Sitemap.
You can create an XML sitemap manually, which is definitely a hard task to do it. So instead of creating a sitemap manually, we will prefer to create XML sitemap through sitemap generators.
Look at the video what Google Webmaster Tools suggest us.
But which are the best tools to generate XML sitemap?
Best XML Sitemap Generator Tools
Here are the 10 Best XML Sitemap Generator Tools for Your Website
But we’ll discuss only the first two sitemap generators, which I think are the best tools for getting an SEO role-playing sitemap for your website.
- Screaming Frog
- WordPress Yoast SEO Plugin
- Slickplan
- Dynomapper
- WriteMaps
- PowerMapper
- XML-Sitemaps
- XML-Sitemap-Generator WordPress Plugin
- InSpyder Sitemap Creator
- Sitemap Writer Pro
Process to Create an XML Sitemap for Your Website
So to take an SEO benefit of XML sitemap, follow these three step:
- Create an XML sitemap for your website.
- Add that XML sitemap to your website.
- Submit your XML sitemap to Google.
Now let’s discuss each point in deep details.
First, we’ll understand how to create an XML sitemap for any website, no matter of what size it is or the CMS it is using.
Second, we will learn how to create an XML sitemap for a WordPress website.
Third, we’ll learn how to submit your XML sitemap to Google.
So let’s proceed,
Create an XML Sitemap Using the Screaming Frog SEO Spider (for any website)?
No matter how bigger your website is, what CMS it is using, you can use the best sitemap generator “Screaming Frog to create an XML sitemap” for any type of website you have.
In fact, you don’t even need to own the website or have login access to it in order to create the sitemap.
Even if you are not the owner of the website/blog you don’t need any login approvals/credentials of the website to create an XML sitemap.
You can create a free XML sitemap with Screaming Frog up to 500 pages URLs. To crawl more than 500 pages/URLs, you need to buy an annual license for Screaming Frog.
To create an XML sitemap up to 500 URLs, you will have to download Screaming Frog and install this desktop version on your PC or laptop.
Believe me, it will help a lot in SEO activities.
Here’s the Screaming Frog pricing and license fee annually.
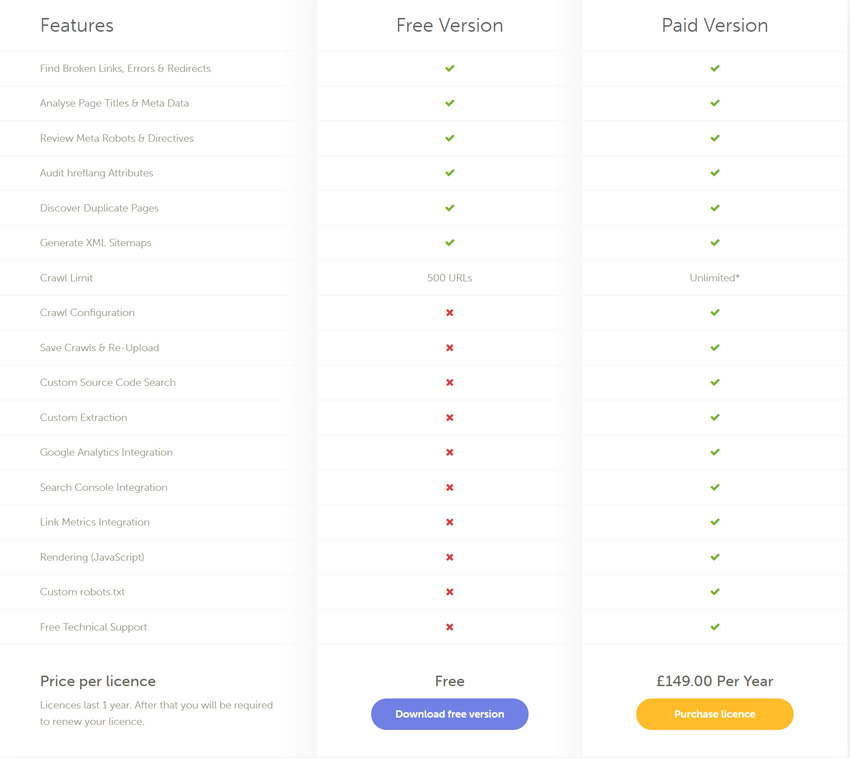
You can use the basic version free of cost but to enhance your sitemap more than 500 pages/URLs, you will have to buy the license which will cost you £149.00 per year (around $180 USD).
Right now, we are going through all the process of how to create an XML sitemap for any website using the free version of Screaming Frog step by step.
So after downloading and installing the desktop version:
Step 1: Open Screaming Frog
Step 2: Copy and paste your website complete URL into the “Enter URL to the Spider” field at the top
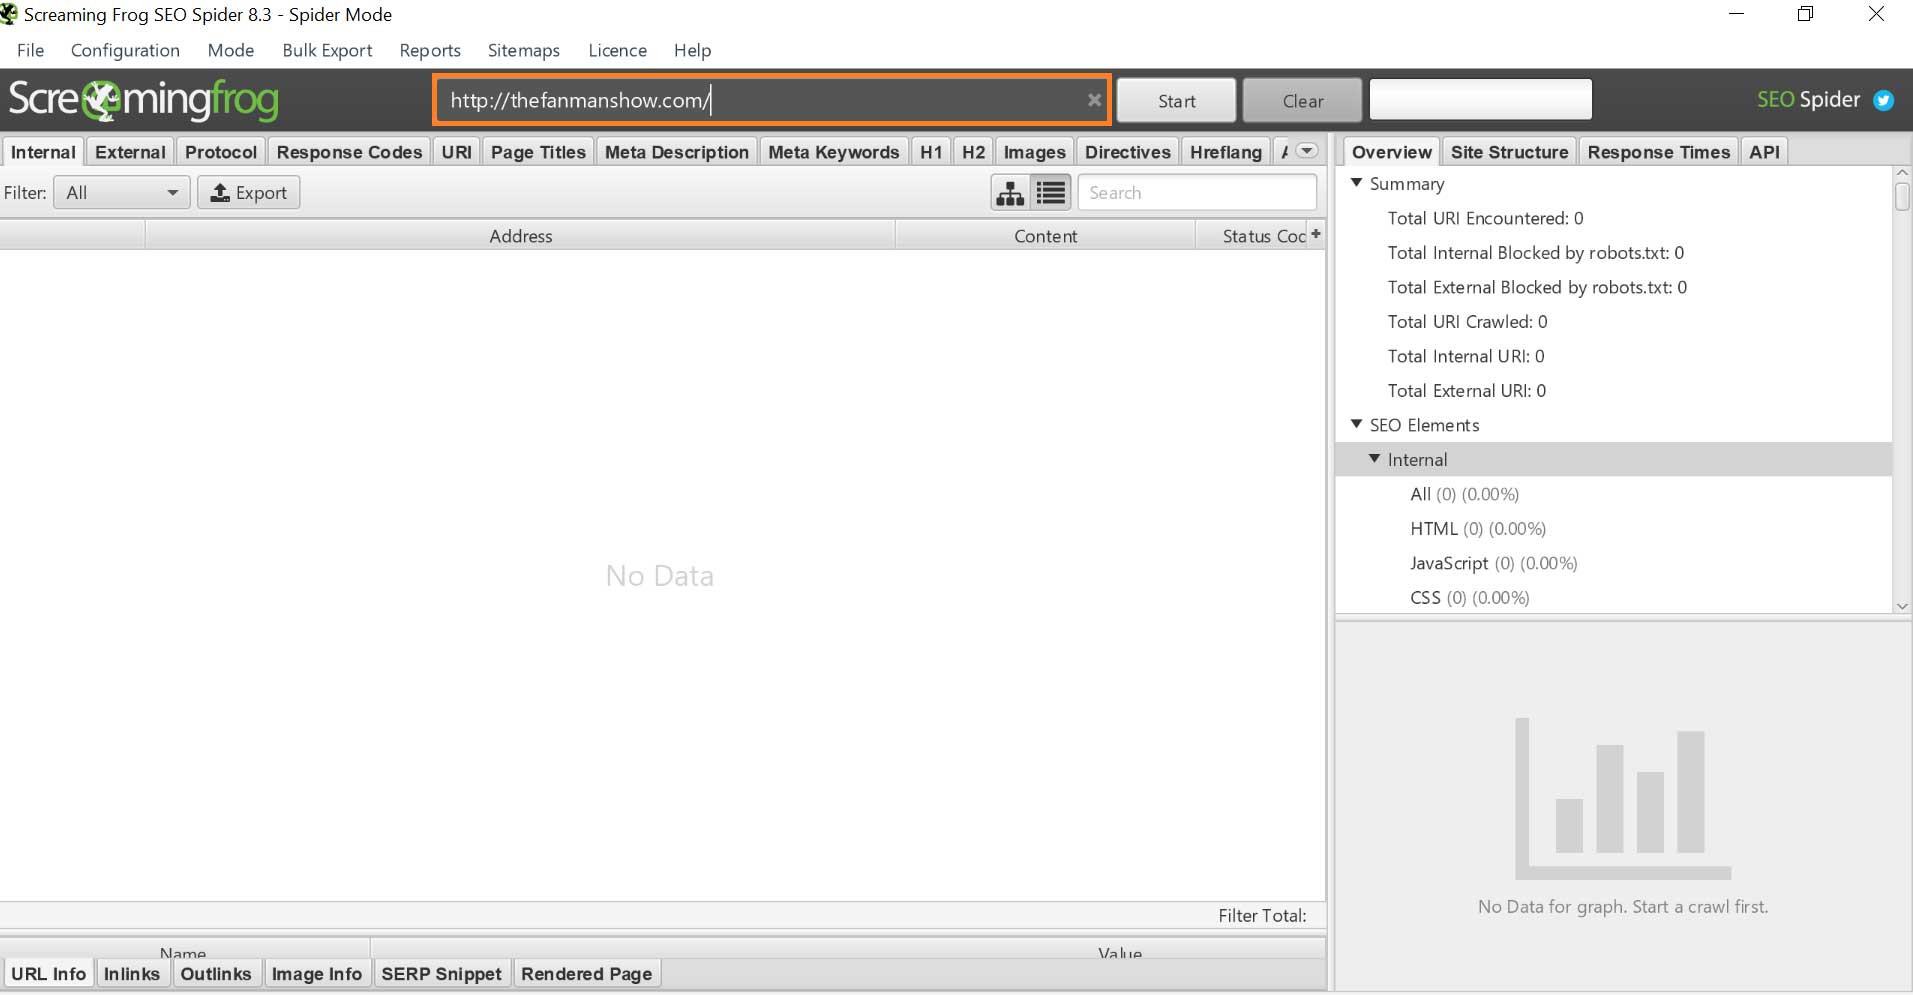
Step 3: just click on Start, to allow the Screaming Frog “creating an XML sitemap for your website”

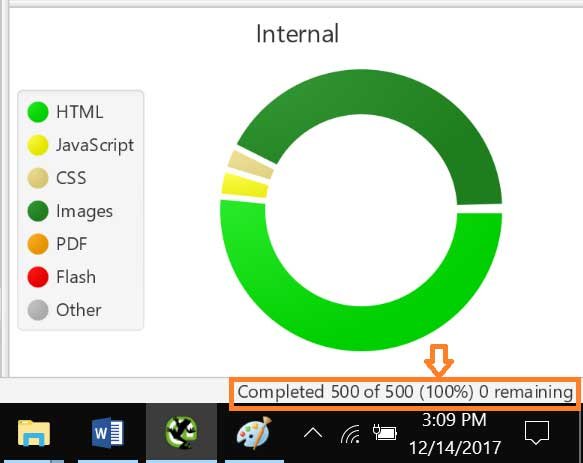
It will start crawling your whole website that can take few minutes to few hours depending your website size, pages, and total URLs.
For a site like NeilPatel.com (2,700+ pages), it only takes about a minute. I’ve worked on some large eCommerce websites with millions of URLs. These have taken hours to crawl.
I have crawled TheFanmanShow.com (almost 2500 URLs) with this piece of software to create an XML sitemap, it took less than a minute to get it ready.
But the websites having millions of URLs can take hours to crawl
When the Screaming Frog will finish the crawling procedure, you’ll see “100” in the status bar. (for free version)
Step 4: now go to the top bar and click on “Sitemaps”
Step 5: Click on “Create XML Sitemap.”

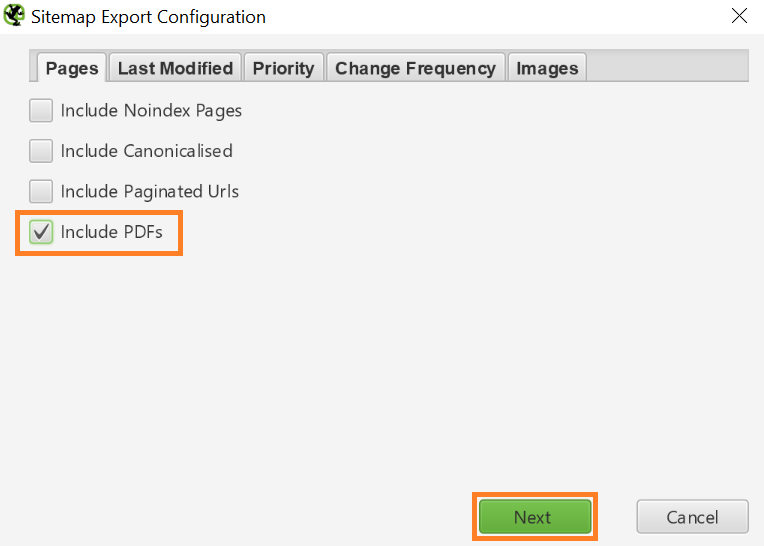
Step 6: Next, you’ll see the “Sitemap Export Configuration”, in which you need to choose which pages, URLs, and other section to include or exclude in the XML sitemap

If, you are not an expert then, these options may be confusing for you. Because you are not sure what does it means by Noindex or canonicalised?
Let me briefly explain about each for you:
Include Noindex Pages —Noindex pages use HTML codes in the header section telling the Search engines not to include such page in the search index, there might be some pages, which you don’t want to index in the search engines with the property set “Noindex”. (Maybe if you are running an eCommerce site and using accounts information from various user and you don’t want Google to index this page, then you simply use “Noindex” accounts page).
If in case, you are in doubt, then do not check this box
Include Canonicalised — There is a possibility that more than one URLs may be pointing to the same page of content. “Include canonicalised” tells the search engines crawlers to include these variations of the URLs while crawling your website.
If in case, you are in doubt, then do not check this box
Include Paginated URLs — A paginated URL is one that includes rel= attributes (rel=“prev” and “next” or a Page number system as 1 2 3 4 Next) to navigate through your website content.
The pagination can dangerous sometimes, if you are not an expert, then you do not check this box.
Include PDFs — The Google indexes all kinds of content that include: text, images, audio, videos, and PDFs etc. No doubt there are thousands of searches made on Google about PDF documents, so “include PDFs” can be an SEO factor for your website. Also, you are creating a sitemap to improve SEO ranking and if you want people to visit your website through PDFs then you must make a checkbox on “Include PDFs”.
The other tabs are “Last Modified”, “Priority”, “Change Frequency” and “Images”.
Let’s have a brief look at each:
Last Modified: in this section, you can add an optional tag with every URL instructing the Google and other search engines about the recent updates and modifications. You can have two options here “Use Custom Date” to include a custom date format on every occasion while opting “Use Server Response” will include the date and time from the server. You are recommended to choose “Use Server Response” option to auto-update your modifications.
Priority: In the “Priority” tab, you set the priority of the pages to tell the Google and other search engines about which pages are important and should be crawled first. So, you need to set your important pages priority from “0.1 to 1”.
I recommend you to:
- Set your homepage priority to “1”
- Set your major category pages priority “0.9”
- Set your smaller category pages priority “0.8”
Change Frequency: If your website is small, you don’t need to babble with the “Change Frequency” configuration. For those websites, which are updated on daily basis and are bigger one, can use this option to add a boost. This will improve the Google’s understanding of how often your website content is updated.
However, I recommend you to use this option if your website is heavier one and is updated often.
Images: Here’s finally the last tab “Images” that allows you to include all the URLs of images used on your whole website. I will recommend you “do not check this option” if you are beginners. So keep this setting unchecked. Later, if you want to include your website for an image search option, you may create a separate image sitemap for your website.
Let’s say you have a normal website, and you want your website to be found with image search option, we check this option to include “images in sitemap”
Step 7: Click on the “images” tab
Make a Check on “Include Images”, doing so the option “Include only relevant images up to 10 inlinks” will automatically be checked. So let it be checked.
Step 7: Click on “Next”
Step 8: The Screaming Frog will ask you to save your sitemap, so choose a suitable location to save your sitemap.
That’s it, you’ve created an XML sitemap with Screaming Frog.
The next step is to upload this XML sitemap to your website via FTP. If you are a beginner and don’t know how to upload an XML sitemap to a website, then you need to consult a webmaster who knows well about the CMS and Server side for this task.
Hence, we have completed the first step of “creating an XML sitemap”.
Let’s suppose, you have uploaded the sitemap to your website, the next step is to submit this XML sitemap to Google.
Keep reading on “how to submit an XML sitemap to Google”.
How to submit an XML sitemap to Google?
Submitting an XML sitemap to Google worth a lot.
To do so, you will need to connect Google Search Console to your website. Stick with this Google guide for further instructions.
How to Connect Website with Google Search Console?
- Go to Google Search Console
- Sign in with your Google account
- A Google Search Console dashboard will open, click on “Add Property”
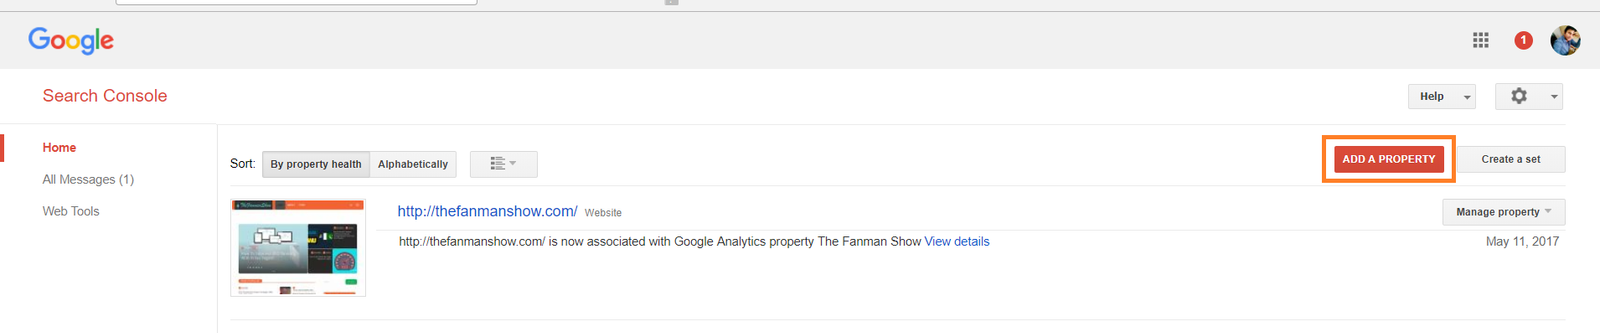
- Select Website (like in the below screenshot)then enter the complete website address of your website as shown in the fig below

- Click on the “Add” button to let your website add to the Google Search Console.
Once your website is added, the Google Search Console will fetch all the data and the content of your website and will present you a complete overview of indexing and suggestions to improve your site.
Now to get SEO benefits submit your sitemap to the Google Search Console.
Submit Your Sitemap to Google Search Console
To do this:
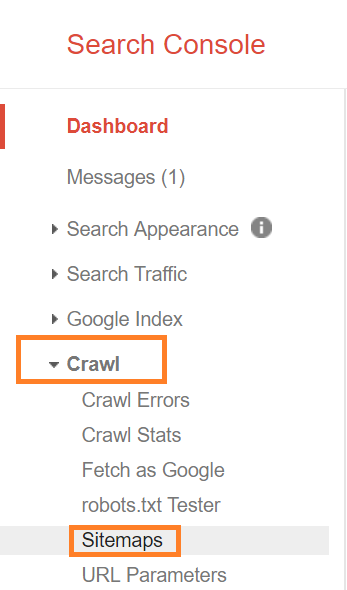
- Click on your website in Google Search Console
(a complete overview and suggestion dashboard will open) - Click on Crawl>> then sitemap
Now your website XML sitemap complete URL will be “https://example.com/sitemap_index.xml”, if generated by Yoast SEO plugin.
But if you have generated it with Google XML then the address may be “https://example.com/sitemap.xml”
Your domain for example “https://example.com/” will be added already, you just need to enter the address after “example.com/” that is “sitemap.xml” or “sitemap_index.xml”.
Carefully look at how I submitted the sitemap for thefanmanshow.com

- Click on the “Submit” button to submit sitemap to Google Search Console
Once you have successfully submitted your sitemap, it will appear as pending.
Actually, Google takes some time to crawl it, maybe after few hours, you can see more stats about your sitemap with complete information as to how many links, images and web pages were found and indexed etc.
We recommend that you check your Search Console at least on a monthly basis for gathering insights and see your website’s SEO progress.
The Fanman Show will recommend you to must do a monthly visit and check sitemap along with other stats on Google Search Console to better optimize your site for WordPress SEO optimization.
Let’s take a turn and proceed towards creating an XML sitemap using Yoast (for WordPress users only)
How to Create an XML sitemap using Yoast WordPress SEO Plugin?
Yoast is one of the most popular SEO plugins for WordPress. Yoast makes it easy to create and submit an XML sitemap.
Yoast WordPress SEO Plugin provides a lot of SEO benefits as well as it creates an XML sitemap for your WordPress website too.
I’ll explain how to do it step-by-step, but first, here’s what you need:
Pre-requisite for Creating an XML Sitemap using WordPress
- You should have a WordPress.org website
- You should have installed the Yoast SEO Plugin
- Your website must be connected to Google Search Console.
Create an XML Sitemap for WordPress
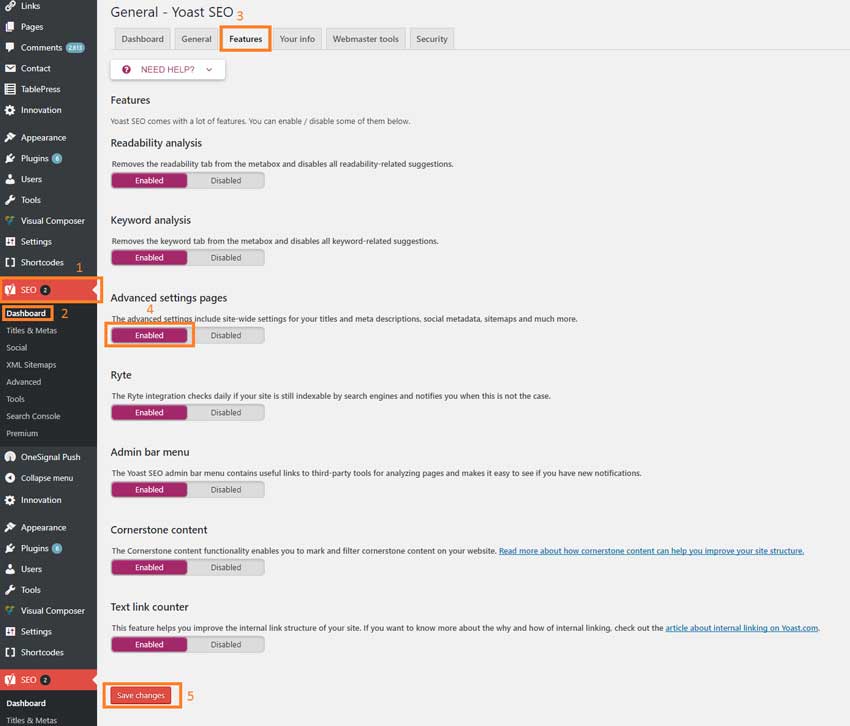
Before creating an XML sitemap for your WordPress site, you need to enable the Advanced Settings in the Yoast SEO Plugin.
Step 1: Log in to your WordPress website with admin credentials.
Step 2: A WordPress dashboard for admin will open, scroll down to the bottom and search for “Y” icon and “SEO” in the (left-hand sidebar) click on it.

Now Click on Dashboard>>Features>>Advance Settings Pages>> click on Enabled>> and then Save to save changes
Step 3: Again click on the SEO tab, The following sub-panel of the Yoast SEO Plugin will open, click on the XML sitemap.

Step 4: Toggle the switch to ‘Enabled’

Step 5: After “Enabled”, the screen will automatically expand with some other additional options for the sitemaps for further XML sitemap customization.
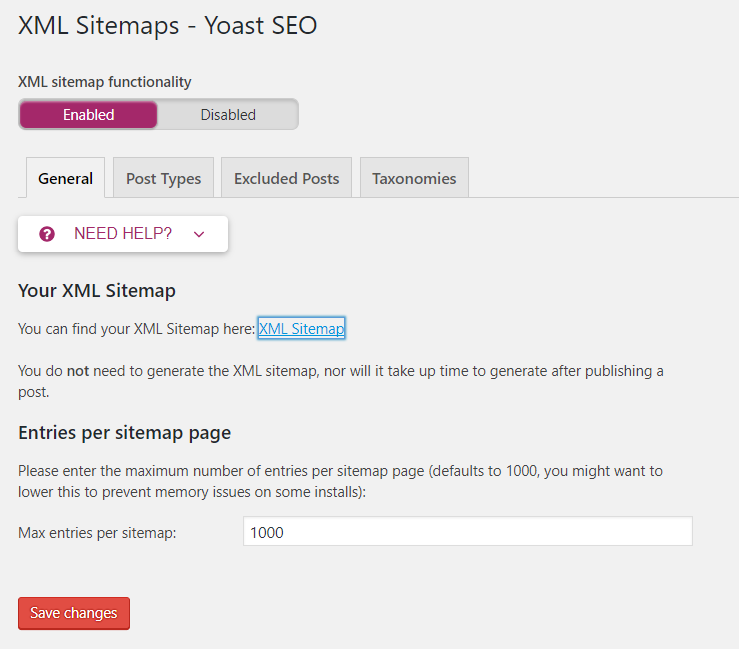
So, let’s discuss each tab with a brief explanation.
General: You can view your XML sitemap here after it is created and you can set entries per sitemap page. (it means how many URL, you want to include in your sitemap), the default settings for maximum entries per page is 1000, you can lower it to set your own customized sitemap.
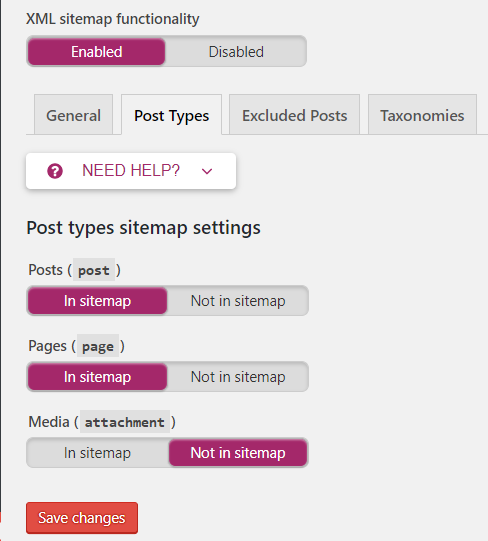
Post Types: The Post Type Sitemap settings refers to what type of content you want to “In Sitemap” (include) “Not in Sitemap” (exclude)? There are three options
- Posts (post)
- Pages (page)
- Media (attachment)
In my case, I have included the first two and left the third option, you can have your own choice if you can create a separate image sitemap for your WordPress site, then leave this option otherwise you can include this option.
Excluded Posts: If you have some pages/posts and you want Yoast to exclude that pages from the sitemap, you can simply give their IDs in “Posts to Exclude” from being not included in your WordPress sitemap.
The Post IDs can be any number, for example, I have to exclude some posts to not include in the sitemap, the pattern becomes as 1, 2, 4, 98, 100. For multiple posts, separate each ID with a Comma. This is the only way to remove pages from sitemap in Yoast SEO plugin.
Taxonomies: The Taxonomies refer to the Categories, Tags and post’s formats and whether to include in sitemap or not in sitemap.
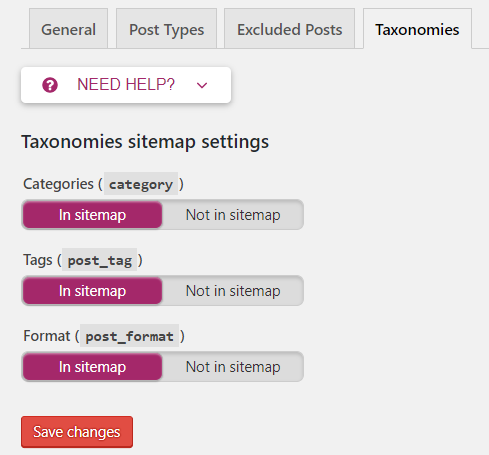
To take maximum SEO benefit from the XML sitemap, I will recommend you to include all the taxonomies options “in sitemap”
Step 6: By clicking on the ‘Save Changes’ will activate XML Sitemaps. So click on the “Save”
That’s it, you have successfully created an XML sitemap for your WordPress website using WordPress Yoast SEO plugin.
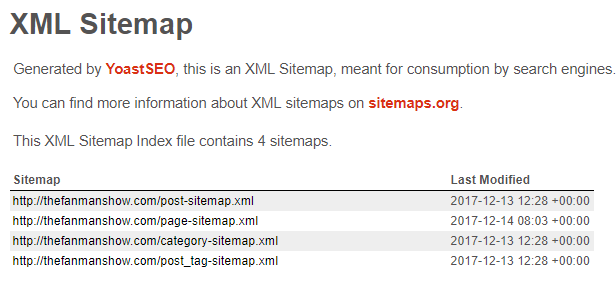
You can take a view of your recently created XML Sitemap by clicking the ‘XML Sitemap’ button.
The next step is to submit Yoast sitemap to Google to get sitemap SEO benefits. We have already discussed it in an article on a step by step guide on what is SEO and how to do WordPress SEO? Scroll down this article to find how to submit and XML sitemap generated by WordPress Yoast SEO plugin.
Conclusion
In my professional career in SEO, I have seen people are afraid of the term “XML Sitemap”.
It happens, if you are not an expert in web development, then how you can figure out “how to create and submit an XML sitemap to Google and other search engines?”
That is why you Google it and finally were on this page.
You have seen that creating an XML sitemap and then submitting in Google is not hard at all.
Because it looks like a baby job to create XML sitemaps in Screaming Frog or with WordPress Yoast SEO plugin in a matter of few minutes.
If you are running your website with a sitemap, then I’ll advise you to get an XML sitemap immediately and submit it to Google as soon as possible to take extra SEO benefit to be found in SERPs smoothly.
What’s your experience creating an XML sitemap? How has it helped your site’s SEO?
Share:
— How was your experience while creating an XML sitemap?
— How it helped your site’s SEO?
Here’s an official video to create an XML sitemap using WordPress Yoast SEO plugin
https://youtu.be/8H8tWH5Lb3I